Showing posts with label chocolate. Show all posts

Tuesday, July 3, 2012

No Oridinary Chocolate Cake

This past weekend we had afternoon tea for our lovely friend Nick's belated birthday. Being a fellow sweet-tooth we decided to design a cake to suit not only his favourite flavours but one that is rich, decadent and just plain delicious! This creation is all Nat's, I just helped create it. 


This cake is very deceptive, from the naked eye (when it's whole) it looks like a good ol' chocolate cake with yummy frosting but when you cut into it there are surprise layers. These consist of chocolate fudge cake hollowed out and filled with peanut butter cheese cake, topped with salted caramel sauce and iced with chocolate frosting. 
Yes, I know what you're thinking, a heart attack on a plate and you may be right, but let me tell you this cake is amazing and I am still dreaming of it now! The really cool thing is that it can be adapted to whatever flavours you like.
This particular cake is going to be dubbed 'The Giant Peanut Butter Cup' and is now in the top 5 of my favourite sweet things, perhaps even my number 1 choice at the moment!!


Friday, June 8, 2012

Salted Caramel Chocolate Fudge Cake

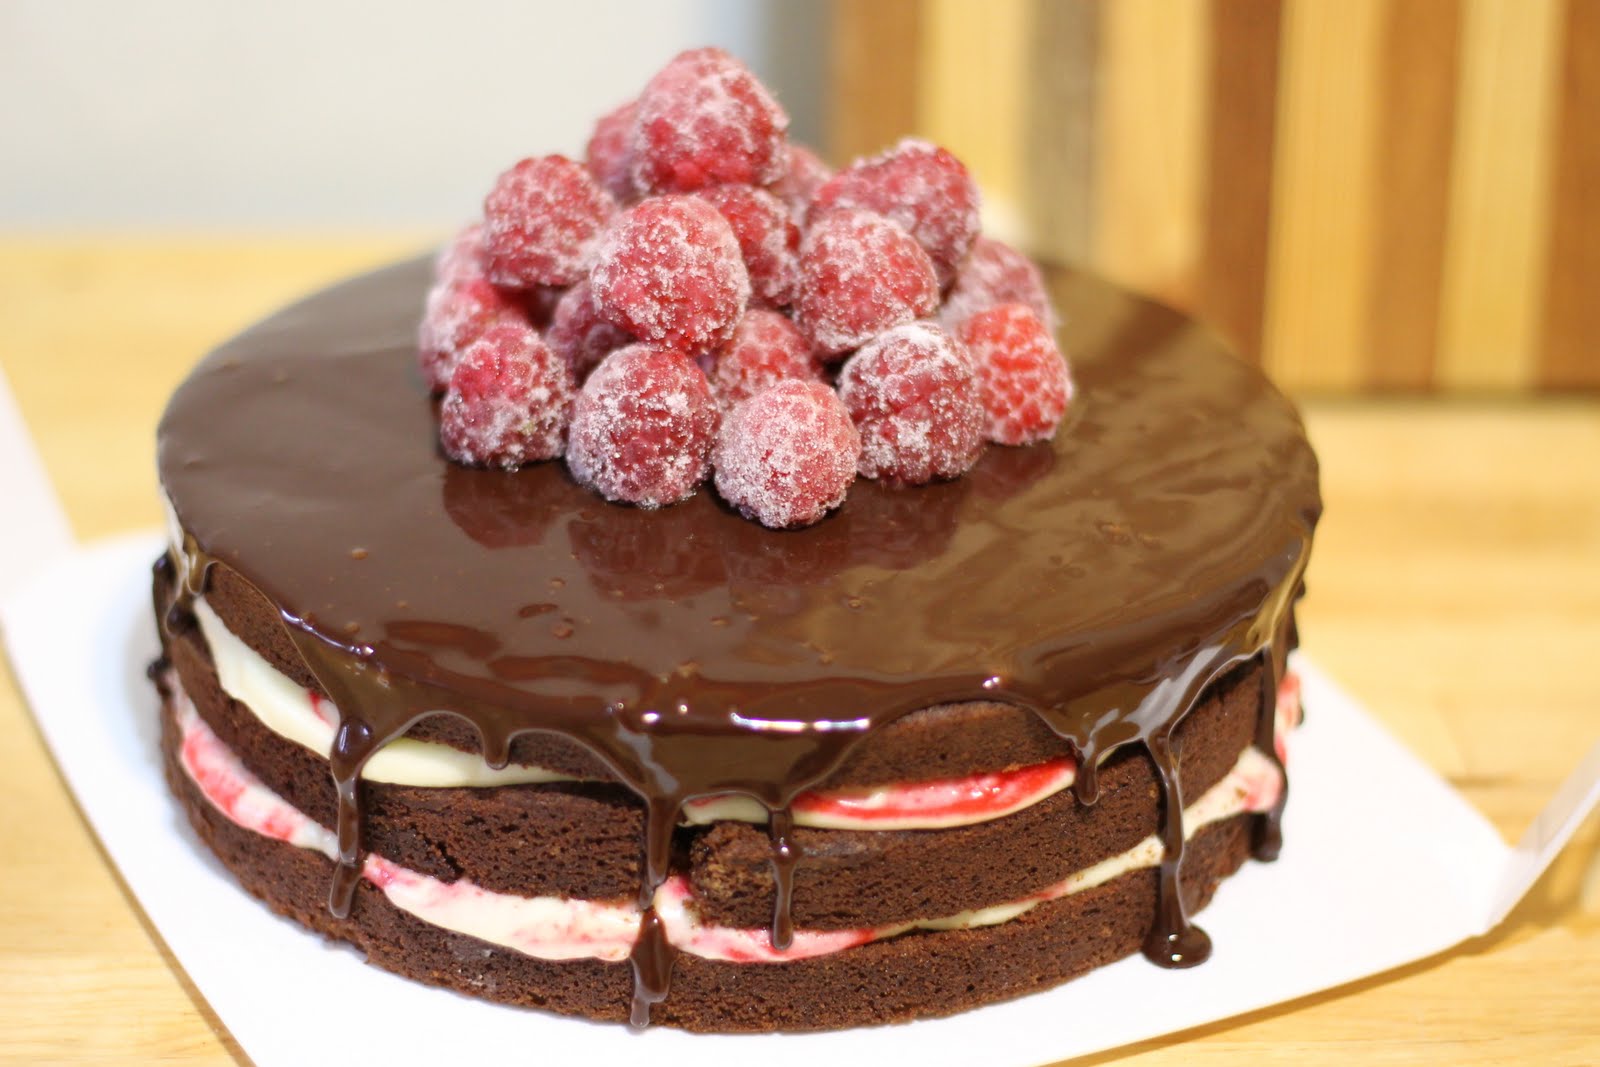
For my gorgeous girls birthday I let her pick a cake for me to create and of course it had chocolate and caramel in it! It was a day of baking 3 mini cake layers (separately), making the richest caramel butter cream (which is amazing) and the chocolatiest fudge frosting I have ever tasted! Needless to say the cake was delicious and I am so thankful I only made a baby cake as it was super rich and decadent.


 *Adapted from  Sweetapolita

3-layer cake

Chocolate Fudge Cake (I used Donna Hays Chocolate Cake)
Ingredients
200g butter, chopped
200g dark chocolate, chopped
30ml water
3 eggs
220g caster sugar
¾ cup self-raising flour, sifted
¼ cup cocoa, sifted

Method
- Oven to 160°
- Place butter, chocolate, vanilla and water in saucepan over a low heat and stir until melted and smooth
- Allow to cool
- Place the eggs and sugar in the bowl of an electric mixer and beat for 6 mins or until pale and thick
- Add the chocolate mixture and beat until combined
- Fold through flour and cocoa, don’t over stir though
- Split the mixture into 3 bowls, pour the first one into a lightly greased 22cm spring form tin and bake for about 45-60 mins (keep checking)
- Repeat this with the other 2 batches of the cake so that you have 3 even cooked layers
- Set aside to cool

Salted Caramel Swiss Buttercream (for the filling)
Ingredients
200g sugar
60 ml water
60ml heavy cream
generous pinch of sea salt 1 1/2 cups (340 g/12 oz) unsalted butter, at room temperature
4 large egg whites (120 g)
1 teaspoon pure vanilla extract

Method
- Place 130 grams of the sugar and the water in a medium saucepan to a boil over medium heat. 
- Brush down the sides of the pot with a dampened pastry brush to prevent sugar crystals from forming. Stop stirring and cook until caramel is dark amber, gently swirling from time to time. 
- Remove from heat, and slowly add cream, whisking by hand until smooth. It will be splatter, so be careful. Whisk in sea salt and vanilla. Let cool.
- Place butter in an electric mixer fitted with the flat beater attachment and beat on medium speed until pale and fluffy, about 3-5 minutes. Transfer to a large bowl and set aside.
- Wipe the bowl of an electric mixer clean with lemon juice, and place egg whites and remaining sugar into bowl over a pot of simmering water (not boiling–you don’t want to cook the eggs). Whisk occasionally and gently until sugar dissolves and mixture registers 160° on a candy thermometer.
- Remove the bowl from heat, and place back onto the mixer fitted with the whisk attachment. Whisk on medium speed for 5 minutes. Increase speed to medium-high, and whisk until stiff, glossy peaks form (about 5-6 minutes). Once the bottom of the bowl is neutral and no longer warm to the touch, reduce speed to medium-low, and add beaten butter, one cup at a time, whisking well after each addition.
- Switch to paddle attachment. With mixer on low speed, add cooled caramel and beat until smooth (about 3-5 minutes).

Dark Chocolate Fudge Frosting
(This makes a fair bit)

Ingredients
45g cocoa powder
90ml boiling water
340g unsalted butter, room temperature
63g icing sugar
pinch of salt
454 good-quality dark chocolate, melted and cooled

Method
- Combine cocoa powder and the boiling water in a small bowl or glass measuring cup, and stir until it cocoa has dissolved.
- In an electric mixer fitted with the flat beater attachment, beat the butter, the icing sugar, and salt on medium-high speed until it is pale and fluffy–about 5 minutes.
- Reduce mixer speed to low, and add melted chocolate (cooled), beating until combined and scraping down the sides of the bowl as needed.
- Beat in the cocoa mixture until well incorporated.

Notes:
Frosting can be refrigerated for up to 5 days, or frozen for up to 1 month in an airtight container.

Assembly of the Sweet & Salty Cake
- Trim any doming from the tops of your cake layers with a sharp, serrated knife and place first layer, face up, on your cake board, pedestal, or plate.
- Using a small offset palette knife, spread approximately 3/4 cup of the caramel buttercream evenly on the top.
- Repeat this 1-2 until you come to the final layer, which you will place face down on the top of the cake.
- Place cake on a turntable (if possible), and using a small offset palette knife for the top of the cake, and medium straight palette knife for the sides, cover the cake in a thin layer of chocolate frosting (or chocolate butter cream, if using) to mask (seal in crumbs).                
- Refrigerate for 30 minutes (or more). *This does not need to be perfect, as that will come with the top “coat” of butter cream.
- Once the icing has cooled, ice again over the top, using a palette knife and a glass of warm water to get a smooth clean finish.
- You can keep it in the fridge but keep it out for 2 hours before serving so the butter cream has softened.
- Sprinkle with salt
- Use a sharp heated knife to cut the cake, cleaning it every cut to get a nice clean finish


Friday, May 18, 2012

Cranberry and White Chocolate Chip Biscuits

With winter just around the corner, I couldn't think of anything more fitting than spending the afternoon baking. I have been meaning to try this recipe for a while and I was very pleased with the result. They were such a hit that after only baking them yesterday, there is 1 left. I made sure I shared them around otherwise I would have eaten them all myself. 


Sunday, April 29, 2012

Chocolately Goodness

Whilst I was busy making the pulled pork extravaganza... Nat was busy whisking, beating, stirring and crushing lots of different flavours together to create one of our new favourites... mini chocolate tarts. 
With endless flavours at our finger tips we researched, tasted and tested a few different ideas to finally come up with 6 different flavours. 
Nat used chocolate ripple biscuits crushed up and stirred with butter the make the base of these yummy tarts and once they were set she filled them with:
- Chocolate Orange
- Chocolate Mint
- Peanut Butter
- Salted Caramel
- Honey Comb
- Oreo


Sunday, January 8, 2012

Double Chocolate, Double Raspberry Layer Cake


This creation was inspired by Donna Hay and designed by my girlfriend Nat and I for our good friend and birthday girl Mishy Lane
With the raspberry and chocolate being the chosen flavours we spent quite a while designing this cake and I must say, I'm quite proud of our creation.


Happy Birthday Mishy!! Hope you enjoyed it!


Chocolate Cake


37g dutch cocoa, sifted
90ml hot water
90g sour cream
175g butter, softened
247g castor sugar (just over 1 cup)
1/2 tbsp vanilla extract
2 eggs, lightly beaten
225g plain flour, sifted (about 1 1/2 cups)
1/2 tsp bi-carb soda


Preheat oven to 180 degrees.
Place cocoa and hot water into a bowl and whisk until smooth, then add the sour cream and combine well.
Place butter, sugar and vanilla extract in an electric mixer and beat until smooth and creamy.
Gradually add eggs and beat well.
Set the mixer at a low speed and add cocoa mixture, flour and bi-carb, beat until well combined.
Place mixture into a lightly greased 20cm round cake tin (line base with baking paper).
Bake for 50-60 mins or until tested with a skewer.
Cool for 10 mins in tin, then remove and cool on a wire rack.
Cool completely before icing.


Philly Cream Cheese/ Chocolate Icing
50g butter, softened
250g philly cream cheese (original)
160g icing sugar, sifted
handful of white chocolate, melted


Combine butter and cream cheese and combine well.
Add icing sugar and combine until smooth and slightly fluffy.
Stir through the melted white chocolate.


Chocolate Glaze (Donna Hay)
150g dark chocolate
1/2 cup cream (single not dollop)


Stir in saucepan until smooth.
Allow to cool for 10 mins before pouring over a well chilled cake
Raspberry Coulis
2 cups raspberries (frozen or fresh)
1 tsp lemon juice
2 tbsp caster sugar


Place all ingredients into a small saucepan, cook on a low heat until raspberries break down and sugar dissolves.
Blitz using a hand blender then strain out seeds


Sugar Coated Raspberries
Fresh raspberries
egg white
caster sugar


Lightly brush the raspberries with egg white.
Roll in sugar then use for decorating.


To assemble the cake.
You will need to cut the tops of the cake so that each layer is completely level.
Cut the cake into layers, use a ruler and measure to get the layers even.
Once you have the desired amount of layers you want (this cake recipe will give you 2, so you will need to make 2 cakes or double the recipe).
For each level except the top, brush the cake lightly with a pastry brush to remove crumbs, then spread a layer of coulis on base.
Add the cream cheese icing, leave about 1/2 - 1cm around the edge as it will squeeze out with the other layers on top.
Dollop on a bit of the coulis over the icing and using a skewer swirl it through the icing.
Place a few raspberries around the cake then repeat for each desired layer.
Now refrigerate the cake for at least 1/2 hour.
Once it is chilled, pour over the ganache and let it run slightly down the sides of the cake.
Refrigerate for a bit to let the ganache set.
Place the sugared raspberries on the top.


Now enjoy it!


It's truly delicious.

Tuesday, November 15, 2011

Our First Dinner Party


Last Saturday, the 12th November Nat and I hosted our first proper dinner party. With my love for Tapas there was no doubt that that would be the theme of the evening. We planned a menu based around some of our favourite dishes, some of which were made into miniatures. We shopped for all the produce (bar the cream etc) at the Prahran Markets which are conveniently around the corner from us.


We began with marinading the fruit for the sangria, the desserts were setting in the fridge (which were made on Friday night) We then slowly cooked our way through the menu.

The Menu:

Main Course-
Salt and Pepper Squid with Lime Aioli
Fennel and Pork Meatballs in Napoli sauce with fresh Basil and Garlic Bread
Chorizo and Tzatziki on Crunchy Bread
Mini Basil Pesto Burgers with Relish, Cheese and Rocket
Tarts with Cherry Tomatoes, Caramelised Onion, Basil Pesto and Bocconcini
Chicken and Haloumi on toothpicks cooked in Honey and Thyme
Ham and Cheese Croquettes

Dessert:
Mini Tim Tam Cheese Cakes with Raspberries
*Nutties with Lemon Curd and Strawberry Coulis
Chocolate Mousse with Burnt Toffee with Orange Zest

It was tonnes of fun and will definitely be doing it again soon.


*Nutties are basically Anzac Biscuits, we put them into cupcake trays to mould them like cups.


Thursday, October 28, 2010

Sweet Tooth

It's hard living with a sweet tooth, when I lived with friends I never made desserts as I am prone to eat every bit until it is no longer. But as of late, my ability to restrain myself is overridden by my unnecessary need for sweets.


Sweet Sweet French Toast with a twist.
This one is very simple and definately a sweet tooths heaven.

Slices of older crunchy bread
Honey
Cinnamon and sugar
Apple
Egg

Slice the bread quite thick and soaked it in honey, only enough to cover it (lightly warm the honey as it spreads easier). The bread needs to be relatively solid or it will fall apart. Then let it sit for a bit. While that is resting finely slice an apple and coat it with sugar and cinnamon, then lightly cook it in a frying pan with butter. Once this is remove them from the pan and put them into a bowl. Then quickly dipthe bread into a whisked egg. Then cook it in butter in the same frying pan. Once cooked (which doesnt take long, as the honey will burn if left for too long) lightly sprinkle on some raw sugar, then place the apple on top.

It can be left like this or served with some marscapone, natural yoghurt or cream.


Visiting my Nannas place recently I was lucky enough to eat my way through one of her famous 'Apricot Pies', that is made from her home made pastry and home grown and stewed apricots.


I had some left over shortcrust pastry and was have a sugar craving, so I cooked it flat, then cut it into squares, then sliced strawberries and placed them on top and drizzled over some melted dark chocolate. Yummy, easy and a good way to use left over pastry.


Tuesday, September 7, 2010

Too sweet or not too sweet!

I am not usually a dessert person, but for some unknown reason (maybe it's the change of season) I have been craving sweets and lots of chocolate. So to mix things up I have been making lots of little things for dessert.

This first one is strawberries dipped in melted dark chocolate then rolled in crushed pistachio nuts. Fresh, salty and sweet, what more could you want.

An experiment with mint slice biscuits, short crust pastry and crushed straberries mixed through ricotta. An interesting combination, but it was amazing.
I crushed mint slice biscuits in my pestal and mortar and put that on the pastry first, then I topped it with the ricotta mixture, then sprinkled some more of the mint mixture and a few pieces of fresh strawberries to finish it off.
Simple and yummy, the mini ones were great!

Friday, August 27, 2010

'Tea for Two'

Despite the disgusting weather we have encountered this past week, there are still hints of spring in the air. I was out driving the other day i came across these gorgeous blossoms (I'm assuming that what they are) and thought to myself, spring is definately near, and tea for two is a must.


A cup of tea in spring is a delight; the weather is perfect to drink a hot drink with the smell of flowers and sunshine floating gently through the air. I have taken poetic liscence on the idea of 'tea' and have created (with the help of my beautiful girlfriend) a fabulous dessert which is as delicate as tea but a little more delicious if I say so myself.
After making a batch of delicious Chocolate Ganache Tarts, my girlfriend mixed through chopped rasberries through the remaining ganache. To serve, we then put it into pastry moulds and mini tea cups. We made some extra pastry pieces and cut strawberries to dunk into the velvet chocolatey goodness to place on the saucer. This was incredibly easy and absolutely deslish!


For those of you who want to try it:
Chocolate Ganache.
200g good quality dark chocolate
125ml thickened cream
50g butter, cold, chopped roughly
Optional: 3 tbsp brandy/ vanilla/ 3tbsp orange juice (Not all of them together!)
Stir all ingredients together in small saucepan over a low heat until smooth.
Allow to cool and thicken before using.
*If allowed to thicken significantly you can pour it into cases to make ganache tarts
*Mix in a punnet of rasberries (crushed/ roughly chopped)
And then simply enjoy, they are amazing and very addictive.